顯示具有 Ubuntu 標籤的文章。 顯示所有文章

2015年5月6日 星期三

VirtualBox NAT + Host-only (Ubuntu)

virtualBox

設定 ->  網路 ->
  • 界面卡1 選 NAT
  • 界面卡2 選 僅限主機界面卡
兩界面卡用預設值即可


linux 中
  • sudo vim /etc/network/interfaces

auto lo
iface lo inet loopback

auto eth0
iface eth0 inet dhcp

auto eth1
iface eth1 inet static
address 192.168.56.1
netmask 255.255.255.0
#network 192.168.56.0
#broadcast 192.168.56.255
gateway 192.168.56.254
#dns-search cloudspace.local
#dns-nameservers 8.8.8.8 8.8.4.4
 
or 
auto lo
iface lo inet loopback

auto eth0
iface eth0 inet dhcp

auto eth1
iface eth1 inet dhcp
 
 
ps. 在virtualBox linux 中可利用 route查詢 default Gateway 來填入 
 
  • sudo /etc/init.d/networking restart 
 
資料來源:
  • http://askubuntu.com/questions/446183/how-to-set-up-nat-and-host-only-networking-with-static-ip-address-in-virtualbox 


Ubuntu 網卡設定DHCP


  1. sudo  vim /etc/network/interfaces
  2. 將 iface eth0 inet static 改成 iface eth0 inetdhcp
  3. sudo /etc/init.d/networking restart
VirtualBox就重開機一下吧。
PS. 如果你有第二張網卡 


auto eth1
iface eth1 inetdhcp


PS. 如果想用固定IP
#Class C 設法
iface eth0 inet static 
address 192.168.1.2
netmask 255.255.255.0
gateway 192.168.1.1


資料來源:
  • http://askubuntu.com/questions/446183/how-to-set-up-nat-and-host-only-networking-with-static-ip-address-in-virtualbox

2015年5月5日 星期二

Ubuntu SSH install

SSH Server目的:

  讓linux系統可以利用SSH機制被遠端操作 (使用公私鑰機制驗證)。

  備註1:以下命令已經切換至 root, 若沒有切換至root,記得在命令前面加sudo。


1. 查詢套件安裝狀況
  • dpkg -l | grep ssh
      如果只有看到 openssh-client,就是還沒安裝 SSH server。


2. 查詢 ssh 是否有在運作的指令
  • netstat -a | grep ssh
如果看到
tcp    0  0  *:ssh     *:*     LISTEN
tcp6  0  0  [::]:ssh  [::]:*   LISTEN

表示ssh有在運作


3. 關閉 ssh
  • service ssh stop
4.啟動 ssh
  • service ssh start
5.重啟 ssh
  • service ssh restart

6. 安裝 ssh
  • apt-get upudate    //更新套件清單
  • apt-get install ssh

7.用戶端SSH金鑰
  •  key會在家目錄的.ssh 
  • .ssh可看到  id_ras 、 id_ras.pub。  
  • id_ras 是私鑰,這個不可以給別人。
  • id_ras.pub 是公鑰,這是要給ssh服務的伺服器用的。
8. 上傳公鑰到目標伺服器
  • ssh-copy-id -i id_ras.pub  [登入帳號]@[位置]  // 記得 -i  不加會找錯key
      在mac中如果沒有ssh-copy-id指令,有兩種選擇:
    
         a. brew install ssh-copy-id 安裝命令
     
         b. 用scp 上傳 public key

             1. 在serve端  ~/ 建立 .ssh資料夾。
                  cd ~/
                  mkdir .ssh

             2. 在client電腦將公開金鑰上傳
                 scp id_ras.pub [登入帳號]@[位置]:/home/[帳號名稱]/.ssh/authorized_keys

9. 更改 authorized_keys 權限
  • chmod go-w ~/
  • chmod 700 ~/.ssh
  • chmod 600 ~/.ssh/authorized_keys

10.關閉帳號密碼登入
  •  sudo vim /etc/ssh/sshd_config
  • 將 PermitRootLogin without-password 改成 PermitRootLogin no
  • 取消註解 AuthorizedKeysFile      %h/.ssh/authorized_keys
  • PasswordAuthentication yes 改 PasswordAuthentication no  //關閉遠端帳號密碼登入


11.  ssh連線
  • ssh [登入帳號]@[位置


參考資料:
  • https://help.ubuntu.com/14.04/serverguide/openssh-server.html
  • https://help.ubuntu.com/community/SSH/OpenSSH/Configuring
  • https://help.ubuntu.com/community/SSH/OpenSSH/Keys
  • http://blog.crboy.net/2012/05/ssh-security-note.html

linux locale

1. 查詢機器上已經安裝的語系
  •  locale -a
2.編輯 local文件
  • sudo vim /var/lib/locales/supported.d/local
  • 文件中加入 zh_TW.UTF-8 UTF-8
  • 離開vim
3.加入語系
  • sudo locale-gen

後記:
      為什麼要設定local,因為當你 tomcat utf-8 設定都設了,程式也沒問題,html宣告也對了,DB設定也對了,但寫入db的中文不對勁,那就是最底層的linux語系缺少zh_TW.UTF-8造成的。


參考資料:
  • http://tutul.logdown.com/posts/2014/08/13/ubuntu-server-12-04-lts-change-language
  • http://www.arthurtoday.com/2009/11/ubuntu-locale.html

2014年8月14日 星期四

ubuntu install git


Install Git
  • $ sudo apt-get install git

   Note:如果是windows則是使用msysGit


Install Git GUI

  • $ sudo apt-get install git-cola
          在新目錄中  git init,能夠建立新的git repository


   Note:  linux上有需多種GUI可選擇。
       

Reference

2012年3月25日 星期日

Ubuntu install VM Workstation

1.Downloader VMWare
2.Modify Permissions
  • sudo chmod +x VMware-Workstation-Full-8.0.2-591240.x86_64.bundle
3.Modify Warnings "Gtk-WARNING **: 無法在module_path 中找出佈景主題引擎:‘pixmap’ "
  • sudo apt-get install gtk2-engines-pixbuf
4.install VMWare Workstation
  • sudo ./VMware-Workstation-Full-8.0.2-591240.x86_64.bundle 

2012年3月23日 星期五

shell底下執行php

1.安裝php-cli

  • sudo apt-get update
  • sudo apt-get install php5-cli
2.test
  • php -v

Ubuntu apt 安裝 xdebug

1.更新
  • sudo apt-get update 
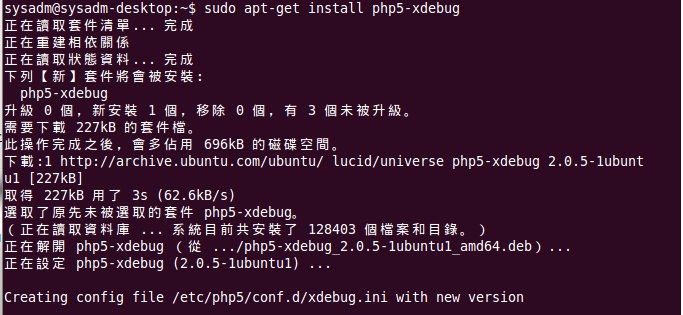
2.安裝
  • sudo apt-get install php5-xdebug


3.modify conf file

  • sudo gedit /etc/php5/apache2/conf.d

add:
zend_extension=/usr/lib/php5/20090626/xdebug.so
xdebug.remote_port = 9000
xdebug.remote_host = localhost

4.restart apache server

  • sudo /etc/init.d/apache2 restart
5.查詢xdebug 啟動版本

  • php -v
若是無法使用指令請安裝php5-cli請參考php shell環境安裝。


資料來源:
http://stackoverflow.com/questions/5504152/is-it-possible-to-use-xdebug-on-ubuntu
http://ubuntuforums.org/showthread.php?t=525257

2012年3月7日 星期三

ubuntu Server 安裝 x-windows

Step1.請先參考ubuntu server apt proxy 設定
Setp2.x-windows install

  • 台灣下載目前有點問題,請參考 http://jt-java.blogspot.com/,將server位置中有tw的都拿掉。
  • 將被註解的#位址都打開
  • apt-get update 
  • apt-get upgrade 
  • sudo aptitude install x-window-system-core
  • sudo aptitude install xorg
  • sudo aptitude install ubuntu-desktop
    or
    sudo aptitude install xubuntu-desktop
    or
    sudo aptitude install fluxbox fluxconf

  • sudo aptitude install gdm
    or
    sudo aptitude install xdm    
  • sudo reboot


相關參考連結:


有關apt使用參考:
http://apt.nc.hcc.edu.tw/web/apt/apt.html
http://www.debian.org/doc/manuals/apt-howto/ch-apt-get.zh-tw.html

2012年3月3日 星期六

Ubuntu安裝桌面捷徑工具

Ubuntu11.10拿掉了原本的的右鍵建立捷徑,可參考下列方式使用


安裝
sudo apt-get install --no-install-recommends gnome-panel


使用方法
gnome-desktop-item-edit ~/Desktop/ --create-new


ubuntu 新增啟動圖示

OS Ubuntu 10.04


Step1.新增啟動圖示
  • 滑鼠右鍵→新增啟動圖示
Step2.欄位輸入數值 (這裡使用Eclipse作為範例)

  • 類型:應用程式
  • 名稱:eclipse
  • 指令:/opt/eclipse/eclipse


若你想改變ICON點擊圖片即可,然後選擇你想要用的ICON檔案。
eclipse可以使用eclipse資料夾裡的icon.xpm。

64bit Linux 想使用32bit環境

If you are running a 64-bit distribution on your development machine, you need to install the ia32-libs package using apt-get:: 

  • sudo apt-get install ia32-libs

在64bit linux下開發 android 會使用到,android目前開發環境是32bit

Ubuntu安裝MySQL

安裝
sudo apt-get install mysql-server mysql-client
更改密碼
sudo mysqladmin -u root -p NEWPASSWORD
ReStart
sudo /etc/init.d/mysql restart

Ubuntu上安裝Ruby

§Ubuntu中安裝Ruby
以下純粹個人筆記
1.安裝ruby 1.8
sudo apt-get install ruby-full

查詢ruby版本
ruby -v

2.安裝RubyGems
  • 2.1查詢RubyGems版本,於Terminal模式中輸入gem  -v。
  • 2.1.1若無出現版本號,至http://rubyforge.org/projects/rubygems/於Latest File Releases中找到Download點擊進入下載頁面,如下圖。

  • 2.1.2進入下載頁,下載最新版rubygems的tar.gz(tgz)或zip。

    • 2.1.3下載完畢後,用tar xzvf  yourRubyGemsFileName解壓,本文是tar xzvf  rubygems-1.3.6.tar,如果你貼在ubuntu的桌面,路徑會是~/Desktop,你也可以直接點擊他解壓。
    • 2.1.4使用cd [目錄名稱],進入解壓好的檔案夾,然後執行sudo ruby setup.rb。
    • 2.2若查詢結果RubyGems已經存在可以使用sudo gem install rubygems-update直接更新最新版。  
    PS.Linux常用指令
    cd [路徑]
    cd  回到家目錄
    cd~ 回家目錄
    cd.. 回上層
    ls ,檔案與目錄檢視
    pwd ,顯示目前所在路徑
    mkdir [目錄名] ,建立目錄
    rmdir  [目錄名] ,刪除目錄
    cp [來源] [目的] ,copy

    3.gem查詢
    查安裝了什麼
    gem q
    查可用gem包
    gem list
    查詢可用 remote
    gem list --remote
    特定查詢
    gem query --remote --name-matches class

    詳細資訊
    gem env

    4.安裝Rails
    sudo apt-get install rails
    或

    sudo gem install rails --include-dependencies
    移除Rails
    sudo apt-get autoremove
     
    5.安裝MySQL
    sudo apt-get install mysql-server mysql-client
    或
    sudo gem install mysql


    6.安裝Mongrel cluster
    sudo apt-get install build-essential ruby1.8-dev
    再用
    gem i mongrel mongrel_cluster -y


    7.安裝webServer nginx
    sudo apt-get install nginx

    移除
    sudo apt-get remove nginx

    Ubuntu10.04 desktop amd64於VM安裝完後鍵盤無法使用處理

    §Ubuntu 10.04 desktop amd64 於VM上安裝完後鍵盤無法使用處理

    1.點擊無障礙偏好設定(在Ubuntu右下角的有一個圈圈包了個小人圖示),如下圖。


    2.出現無障礙偏好設ToolTip,點擊黑色色塊"無障礙偏好設定"題示,如下圖。


    3.勾選第一個選項,"使用螢幕鍵盤(K)",如下圖。


    4.將Ubuntu關機(shutDown),重新開機後螢幕鍵盤才會出現,不然只會看到他閃一下即不見。

    5.登入後,打開Terminal(終端機),輸入以下指令來設定ubuntu的預設值

    • sudo gedit /etc/default/console-setup
    6.輸入上述命令後會問你root的密碼,輸入root密碼即可開啟檔案修改。


    7.修改內容
    將拉到檔案最下方找到這四行設定
     XKBMODEL="SKIP"
     XKBLAYOUT="us"
     XKBVARIANT="U.S. English"
     XKBOPTIONS=""  
    修改成為
     XKBMODEL="pc105"
     XKBLAYOUT="us"
     XKBVARIANT=""
     XKBOPTIONS=""

    8.重新啟動Ubuntu之後即可使用鍵盤。
    附註:
    也可以使用nano在終端機內直接修改
    • sudo nano /etc/default/console-setup