2011年12月27日 星期二

Flex PieChart 圓餅圖 突出特效


<?xml version="1.0" encoding="utf-8"?>
<s:Application xmlns:fx="http://ns.adobe.com/mxml/2009"
xmlns:s="library://ns.adobe.com/flex/spark"
xmlns:mx="library://ns.adobe.com/flex/mx" minWidth="955" minHeight="600"
>
<fx:Script>
<![CDATA[
import mx.charts.events.ChartItemEvent;
import mx.charts.series.items.PieSeriesItem;
import mx.collections.ArrayCollection;
import mx.effects.easing.Elastic;
import mx.events.FlexEvent;

protected function itemClick(event:ChartItemEvent):void
{
//取得被點擊的切片項目
var item:PieSeriesItem = event.hitData.chartItem as PieSeriesItem;

//讓餅圖突出的效果
var arr:Array = [];
arr[item.index] = 0.2;
pieSeries.perWedgeExplodeRadius = arr;
}

]]>
</fx:Script>
<fx:Declarations>
<s:XMLListCollection id="provider">
<s:source>
<fx:XMLList xmlns="">
<product label="Product 1" data="3" />
<product label="Product 2" data="1" />
<product label="Product 3" data="4" />
<product label="Product 4" data="1" />
<product label="Product 5" data="5" />
<product label="Product 6" data="9" />
</fx:XMLList>
</s:source>
</s:XMLListCollection>
</fx:Declarations>
<mx:PieChart id="pieChart" dataProvider="{provider}" showDataTips="true"
itemClick="itemClick(event);" width="400" height="400"
>
<mx:series>
<mx:PieSeries id="pieSeries" field="@data" nameField="@label" labelPosition="none" reserveExplodeRadius="0.2">
<mx:showDataEffect>
<mx:SeriesInterpolate duration="1500" easingFunction="{Elastic.easeOut}" />
</mx:showDataEffect>
<mx:filters>
<mx:DropShadowFilter />
</mx:filters>
</mx:PieSeries>
</mx:series>
</mx:PieChart>
</s:Application>


要注意的是:
PieSeries的reserveExplodeRadius數值要與arr[item.index] = 0.2; 的數值相同,不相同時餅圖被click時會看見整體的PieChart縮小。

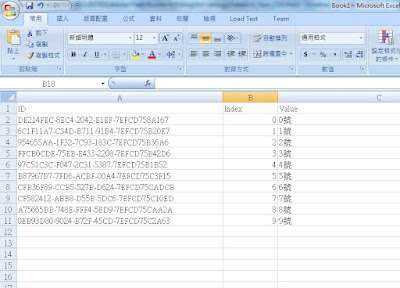
Flex DataGrid 複製至剪貼簿 CSV格式


<?xml version="1.0" encoding="utf-8"?>
<s:Application xmlns:fx="http://ns.adobe.com/mxml/2009"
xmlns:s="library://ns.adobe.com/flex/spark"
xmlns:mx="library://ns.adobe.com/flex/mx"
minWidth="955" minHeight="600"
creationComplete="start(event)"
>
<fx:Script>
<![CDATA[
import flash.desktop.Clipboard;
import flash.desktop.ClipboardFormats;

import mx.collections.ArrayCollection;
import mx.events.FlexEvent;
import mx.utils.UIDUtil;

protected function start(event:FlexEvent):void
{
  var provider:ArrayCollection = new ArrayCollection();
  for(var i:int=0 ; i < 10 ; i++)
  {
    provider.addItem( {id:UIDUtil.createUID() , index:i , value:i + "號"});
  }
  grid.dataProvider = provider;
}

protected function copy(event:MouseEvent):void
{
  var csv:String = "";
  var item:Object;
  csv = "ID" + "\t" + "Index" + "\t" + "Value" + "\n";
  for(var i:int ; i < grid.dataProvider.length ; i++)
  {
    item = grid.dataProvider.getItemAt(i);
    csv += item['id'] + '\t' + item['index'] + '\t' + item['value'] + '\n';
  }

//寫入剪貼簿
Clipboard.generalClipboard.clear();
Clipboard.generalClipboard.setData(ClipboardFormats.TEXT_FORMAT , csv , false);
}

]]>
</fx:Script>
<s:VGroup>
<s:DataGrid id="grid"
  verticalScrollPolicy="off"
  variableRowHeight="false"
  editable="false"
  selectionMode="singleRow"
  alternatingRowColors="{new Array(0xF0F0F0, 0xFFFFFF)}">
  <s:columns>
   <s:ArrayList>
    <s:GridColumn dataField="id" headerText="ID" resizable="false"    minWidth="300"/>
    <s:GridColumn dataField="index" headerText="Index" resizable="false"   minWidth="80"/>
    <s:GridColumn dataField="value" headerText="Value" resizable="false" minWidth="80"/>
   </s:ArrayList>
  </s:columns>
</s:DataGrid>

<s:Button label="複製到剪貼簿" click="copy(event)"/>
</s:VGroup>
</s:Application>


如此可以簡單的貼到execel中。

CSV格式參考文件

BitmapData merge


<?xml version="1.0" encoding="utf-8"?>
<s:Application xmlns:fx="http://ns.adobe.com/mxml/2009"
xmlns:s="library://ns.adobe.com/flex/spark"
xmlns:mx="library://ns.adobe.com/flex/mx"
minWidth="955" minHeight="600"
creationComplete="start(event)"
>
<fx:Script>
<![CDATA[
import mx.core.BitmapAsset;
import mx.events.FlexEvent;

[Embed(source="assets/iphone4.jpg")]
private var Iphone:Class;

[Embed(source="assets/cat.jpg")]
private var Cat:Class;

[Embed(source="assets/background.jpg")]
private var BackGround:Class;

protected function start(event:FlexEvent):void
{
var iphone:Bitmap = new Iphone() as Bitmap;
var cat:Bitmap = new Cat() as Bitmap;
var backGround:Bitmap = new BackGround() as Bitmap;
var mixBitMapData:BitmapData = backGround.bitmapData;


var catX:Number = (backGround.width - cat.width)/2;
var catY:Number = (backGround.height - cat.height)/2;

//合併背景與貓
mixBitMapData.merge(cat.bitmapData , cat.bitmapData.rect ,new Point(catX,catY),0x100,0x100,0x100,0x100);


var iphoneX:Number = catX + 110;
var iphoneY:Number = catY + 50;

//0x100這些是RGBA通道的複製值,0x100是完全,以下會混合
mixBitMapData.merge(iphone.bitmapData , iphone.bitmapData.rect , new Point(iphoneX , iphoneY),0x100,0x100,0x100,0x100);


catUic.width = cat.width;
catUic.height = cat.height;
catUic.addChild(cat);

iphoneUic.width = iphone.width;
iphoneUic.height = iphone.height;
iphoneUic.addChild(iphone);

uic.addChild(backGround);
}
]]>
</fx:Script>
<s:VGroup width="100%" height="100%">
<s:HGroup id="box">
<mx:UIComponent id="catUic"/>
<mx:UIComponent id="iphoneUic"/>
</s:HGroup>

<mx:UIComponent id="uic"/>
</s:VGroup>
</s:Application>


2011年12月5日 星期一

node.js Windows 安裝與初步運行測試


Step1.至官網下載node.js


因為要使用windows環境下測試,所以下載node-v0.65.msi

Step2.下載完畢直接點擊安裝
  • win7平台,預設會安裝在C:\Program Files (x86)\nodejs
Step3.撰寫運行範本example.js

  • 該範例存在C:\nodeJS_UT\example.js

var http = require('http');
http.createServer
(
function (req, res)
{
res.writeHead(200, {'Content-Type': 'text/plain'});
res.end('Hello Node.js\n');
}
).listen(6101, "127.0.0.1");
console.log('Server running at http://127.0.0.1:6101/');


  • 6101是ProtNumber,請自行調整。

Step4.在console執行命令使其運行


  • node example.js是執行命令
  • Server running at http://127.0.0.1:6101/,代表server啟動成功。
Step5.於瀏覽器中呼叫http://127.0.0.1:6101 http://localhost:6101


2011年12月1日 星期四

Eclipse系列工具中文化

//文中圖片是已經中文化過,因此圖片中已經可以看到中文

1.先確定開發工具所用的Eclipse版本 
  • 打開About面板Help -> About


  • 點擊Eclipse圖示


  • 確定Eclipse版本,下圖為3.62


2.到Eclipse官方,查詢Eclipse版本代號
  • 得知3.6為Helios


3.至Eclipse Babel Project Downloads
  • 可以找到Helios的語言包路徑http://download.eclipse.org/technology/babel/update-site/R0.9.1/helios


4.安裝語言包

  • Help -> Install New Sofware


5.Work with 欄中填入語言包下載位置

  • 找到Bable Language Packs in Chinese(Traditional)將其打勾,按下Next,依循安裝指示即可完成。


6.更改IDE安裝路徑中的組態設定檔

  • Aptana Studio3 為  AptanaStudio3.ini
  • FlashBuilder為FlashBuilder.ini
在ini設定檔中加入以下設定,並重新開啟即看見套用的語言介面:

//顯示繁體中文
-nl
zh_TW


//顯示簡體中文  ,當然簡中的話你必須先安裝對應的語言包。
-nl
zh_CN


//顯示英文
-nl
en_US


PS.所有Eclipse為基底的開發工具都可使用


2011年11月30日 星期三

CSS text-shadow + ShlideBar


CSS text-shadow + HTML5 SliderBar
參考資料
CSS Text Level 3
HTML5 Presentation (在裡面有一篇Shodw,可以觀看他的原始碼參考做法,在2599行)
切割法

這是一個簡單的sampe,實際運用,必須用javaScript動態設定抓取css的值給slider的value做初使化才會同步。


0

陰影效果


x= 0 y= 0

<style type="text/css">
#shadow_demo_001
{
 /*text-shadow: x offset y offxet radius*/
 text-shadow: 0px 0px 3px #674ea7;
}
</style>
<span id="_outputValue">0</span>
<input id="_sliderBar" max="30" min="0" type="range" value="0" />
<script type="text/javascript">

$(document).ready(start);

function start()
{ 
 $('#_sliderBar').change(showValue);
}

function showValue(value)
{  
  var newValue = $(this).val();  
  
  //切割css   
   var result = $('#shadow_demo_001').css('text-shadow').match(/(-?\d+px)|(rgb\(.+\))/g);
   //var shadowsX = result[1];  
   var shadowsX  = newValue + 'px';
   var shadowsY = result[2];
   var shadowsSsize = result[3];
   var shadowsColor = result[0];
   var newShadow =  shadowsX +" "+ shadowsY + " " + shadowsSsize + " "+ shadowsColor;  
  
  //更新css
  $("#shadow_demo_001").css({'text-shadow': newShadow})
  //更新<span>的內容
  $("#_outputValue").html(newValue);
}
</script>
<h1>
 <span id="shadow_demo_001">陰影效果</span>
</h1>

CSS3 Borders - border-[top or bottom]-[left or right]-radius

CSS3 module: Border (選擇其中一角做圓角)
參考資料:W3C module Border

border-top-right-radius:10px;
border-top-left-radius:10px;
border-bottom-right-radius:10px;
border-bottom-left-radius:10px;

<style type="text/css"> 
.classBorderB
{
 width:220px;
 height:50px;
 background-color:LemonChiffon;
 border:1px solid LightSkyBlue;
 margin-top:5px; 
 margin-left:10%; 
 margin-right:auto; 
 margin-bottom:20px; 
}

#testDiv1
{
 border:2px solid;
 border-top-right-radius:10px;
 -moz-border-top-right-radius:10 /* Firefox */
 -webkit-border-top-right-radius:10 /* Safari and Chrome */
 -o-border-top-right-radius:10 /* Opera */
}
#testDiv4
{
 border:2px solid;
 border-top-left-radius:10px;:10px;
 -moz-border-top-left-radius:10px; /* Firefox */
 -webkit-border-top-left-radius:10px; /* Safari and Chrome */
 -o-border-top-left-radius:10px; /* Opera */
}
#testDiv2
{
 border:2px solid;
 border-bottom-right-radius:10px;
 -moz-border-top-right-radius:10 /* Firefox */
 -webkit-border-top-right-radius:10 /* Safari and Chrome */
 -o-border-top-right-radius:10 /* Opera */
}
#testDiv3
{
 border:2px solid;
 border-bottom-left-radius:10px;
 -moz-border-bottom-left-radius:10px; /* Firefox */
 -webkit-border-bottom-left-radius:10px; /* Safari and Chrome */
 -o-border-bottom-left-radius:10px; /* Opera */
}

</style>
<div class="classBorderB" id="testDiv1">border-top-right-radius:10px;</div>
<div class="classBorderB" id="testDiv4">border-top-left-radius:10px;</div>
<div class="classBorderB" id="testDiv2">border-bottom-right-radius:10px;</div>
<div class="classBorderB" id="testDiv3">border-bottom-left-radius:10px;</div>

CSS3 Borders - Style

CSS3 module: Border Style
參考資料:W3C module Border

dotted
dashed
solid
double
dot-dash 效果出不來
dot-dot-dash 效果出不來
wave 效果出不來
groove
ridge
inset
outset

CSS3 Borders - radius

CSS3 module: Border
參考資料:W3C module Border

border-radius

<style type="text/css">
.divClass
{
 width:200px;
 height:50px;
 background-color:LemonChiffon;
 border:1px solid LightSkyBlue;
 margin-top:5px; 
 margin-left:10%; 
 margin-right:auto; 
 margin-bottom:5px; 
}

#testDiv1
{
 border:2px solid;
 border-radius:10px;
 -moz-border-radius:10px; /* Firefox */
 -webkit-border-radius:10px; /* Safari and Chrome */
 -o-border-radius:10px; /* Opera */
}
</style>
<div class="ClassRadiusA" id="testDiv1">border-radius</div>

CSS3 transform:rotate( deg )

CSS3目前有支援的瀏覽器

  • Firefox
  • Safari
  • Chrome
  • Opera 
IE8需要透過其他外掛套件來支援,IE9會開始支援HTML5與CSS3


這是div
這是div1,旋轉90deg,與Flex不同,基準點不是左上旋轉。
這是div2,連字也會旋轉,轉45


我們可以看到CSS3旋轉的點是以DIV的中心為基準

HTML+CSS3碼
<style type="text/css"> 
.divClass
{
width:200px;
height:100px;
background-color:LemonChiffon;
border:1px solid LightSkyBlue;
}
div#_rotate_1
{
transform:rotate(90deg);
-moz-transform:rotate(90deg); /* Firefox */
-webkit-transform:rotate(90deg); /* Safari and Chrome */
-o-transform:rotate(90deg); /* Opera */
}

div#_rotate_2
{
transform:rotate(45deg);
-moz-transform:rotate(45deg); /* Firefox */
-webkit-transform:rotate(45deg); /* Safari and Chrome */
-o-transform:rotate(45deg); /* Opera */
}
</style>

<div class="divClass">
 這是div
</div>
<div class="divClass" id="_rotate_1">
  這是div1,旋轉90deg,與Flex不同,基準點不是左上旋轉。</div>
<div class="divClass" id="_rotate_2">
  這是div2,連字也會旋轉,轉45
</div>


參考資料
維基百科webkit
w3Schools

head element


head element,用以描述當前HTML文件內容,如文件的標題、關鍵字,也許作用於搜索引擎,以及其他數據,但不包含文件的本文內容,在head中是不會有可繪製的視覺元素,在head內可用的有<title>、<base>、 <link>、<meta>、<script>、 <style>。

  • base:可以設定HTML文件內預設的href以及target
    • href的值:URI
    • target的值:_blank、_parent、_self、_top、framename。
    • 若使用<a>、<img>、<link>、<form>之類的元素若他們URL未設定,就會使用預設的url。
  • link:用於連接外部資源檔案,最常見的是CSS樣式表,如:
<link href="styleFile.css" rel="stylesheet" type="text/css"></link>

  • style:HTML檔內定義樣式,如:
<style type="text/css">
.demoBackground{background:#DAFFEC}
</style>

//結果
div background is #DAFFEC

  • script用以在HTML本文中使用script或是引用外部script程式語言檔,如:
//結果(直接在HTML文檔裡寫入javascript)
<script type="text/javascript">
//javaScript撰寫於此
</script>

//引用外部javaScript
<script type="text/javascript" src="javaScriptFile.js"></script> 


  • meta使用範例,meta是一名值對(name/content)
<meta name='keywords' content='Flex,flash,學習筆記'/> 
<meta name='author'   content='JT'/> 
<meta name="date"     content="2011/05/24">
<meta name='robots'   content='all'/> 

//http-equiv可以在HTTP的表頭內帶入資訊。
<meta http-equiv="charset" content="utf-8">
<meta http-equiv="Expires" content="Tue, 20 Aug 1996 14:25:27 GMT">


//will result in the HTTP header(HTTP回傳表頭將會):
content-type: text/html
charset:utf-8
Expires: Tue, 20 Aug 1996 14:25:27 GMT

引用與參考資料
w3cSchool:
head元素
link元素
style元素
script元素
meta

W3C官方:
7.4.1 The HEAD element
7.4.4 Meta data

html element


  • <html><html/>標籤是一個HTML文件的根元素(root element)。
  • <html><html/>裡有兩個子元素(child elements)、<head><head/><body><body/>
  • 一個HTML4的文件是由以下三個部份組成
    • 一個有關於HTML版本的宣告 (DTD)。
    • head element,用來敘述內容,以及載入連結資源。
    • body element,關於呈現內容皆至於body。
  • 因此一個基本的HTML組成是由:版本宣告、html 、head、body所組成。
<!DOCTYPE HTML PUBLIC "-//W3C//DTD HTML 4.01 Transitional//EN"
"http://www.w3.org/TR/html4/loose.dtd">
<html>
<head>
<head/>
<body>
 這是一個Basic Document
</body>
</html>


html tags屬性:

  • xmlns:這個屬性值為http://www.w3.org/1999/xhtml,用來定義xml namespace,在XHTML這個屬性是必需的,但即使沒有宣告也不會發生錯誤,因為即使沒加http://www.w3.org/1999/xhtml頁會自動添加到xmlns中。
  • dir:設定元素中的內容呈現的方向,可用ltrrtl
  • lang:設定元素中內容的語言。
  • xml:lang:設定XHTML中元素內容的語言。

dir指定element內文件呈現方向:
  • ltr:Left-to-right text or table(左到右的內文或表格)。
  • rtl:Right-to-left text or table(右到左的內文或表格)。
<code dir="rtl">這是ltr屬性的測試</code>

//結果
這是ltr屬性的測試


lang與xml:lang使用的是ISO 639-1
常用的語言:
  • zh:中文、漢語
  • ja:日語
  • en:英語
因此可以:
<!DOCTYPE HTML PUBLIC "-//W3C//DTD HTML 4.01 Transitional//EN"
"http://www.w3.org/TR/html4/loose.dtd">

<html xmlns="http://www.w3.org/1999/xhtml" lang="zh" xml:lang="zh">
<head>
<head/>
<body>
</body>
</html>


  • 在XHTML中標籤都因該使用小寫

W3C參考文件:
7 The global structure of an HTML document (HTML4 構成元素說明)
8 Language information and text direction (關於dir與lang)

詳細ISO 639請參考:

HTML學習三:版本資訊

資料內容皆是W3C釋出文件
2.HTML的版本資訊(HTML version information)
HTML 4.01 specifies three DTDs, so authors must include one of the following
document type declarations in their documents. The DTDs vary in the elements
they support.

DTD(Document Type Definition):文件類型定義,用來檢驗文件上文法是否正確。

DOCTYPE的宣告可以使用以下三種:
  • The HTML 4.01 Strict DTD includes all elements and attributes that have not been deprecated or do not appear in frameset documents. For documents that use this DTD, use this document type declaration:
         <!DOCTYPE HTML PUBLIC "-//W3C//DTD HTML 4.01//EN"
         "http://www.w3.org/TR/html4/strict.dtd">

         (嚴格模式)
  • The HTML 4.01 Transitional DTD includes everything in the strict DTD plus deprecated elements and attributes (most of which concern visual presentation). For documents that use this DTD, use this document type declaration:
       <!DOCTYPE HTML PUBLIC "-//W3C//DTD HTML 4.01 Transitional//EN"
       "http://www.w3.org/TR/html4/loose.dtd">
        (寬鬆的,過渡期的,一般皆使用這個宣告,可以有較好的相容性)
  • The HTML 4.01 Frameset DTD includes everything in the transitional DTD plus frames as well. For documents that use this DTD, use this document type declaration:
       <!DOCTYPE HTML PUBLIC "-//W3C//DTD HTML 4.01 Frameset//EN"
        "http://www.w3.org/TR/html4/frameset.dtd">
       (使用Frame架構時使用)


The URI in each document type declaration allows user agents to download the
DTD and any entity sets that are
needed. The following (relative) URIs refer to DTDs and entity
sets
for HTML 4:
參考資料
W3C文件
http://www.w3.org/TR/html401/struct/global.html

HTML學習二:HTML結構

本篇資料皆是W3C官方文件的整理
1.HTML結構介紹
(Introduction to the structure of an HTML document)

An HTML 4 document is composed of three parts:

一個HTML4的文件是由以下三個部分所組成
  • 一段宣告HTML版本的訊息,例如:
<!DOCTYPE HTML PUBLIC "-//W3C//DTD HTML 4.01//EN"
"http://www.w3.org/TR/html4/strict.dtd">
一個簡易的HTML Document範例


<!DOCTYPE HTML PUBLIC "-//W3C//DTD HTML 4.01//EN"
"http://www.w3.org/TR/html4/strict.dtd">
<HTML>
  <HEAD>
     <TITLE>My first HTML document</TITLE>
  </HEAD>
  <BODY>
     <P>Hello world!
  </BODY>
</HTML>


or

<!DOCTYPE HTML PUBLIC "-//W3C//DTD HTML 4.01 Frameset//EN"
"http://www.w3.org/TR/html4/frameset.dtd">
<HTML>
  <HEAD>
   <TITLE>A simple frameset document</TITLE>
  </HEAD>
 <FRAMESET cols="20%, 80%">
 <FRAMESET rows="100, 200">
  <FRAME src="contents_of_frame1.html">
  <FRAME src="contents_of_frame2.gif">
 </FRAMESET>
 <FRAME src="contents_of_frame3.html">
  <NOFRAMES>
   <P>This frameset document contains:
   <UL>
    <LI><A href="contents_of_frame1.html">Some neat contents</A>
    <LI><IMG src="contents_of_frame2.gif" alt="A neat image">
    <LI><A href="contents_of_frame3.html">Some other neat contents</A>
   </UL>
  </NOFRAMES>
 </FRAMESET>
</HTML>


------------------------------------------
|Frame 1     |Frame 3       |Frame 4       |
|            |              |              |
|            |              |              |
|            |              |              |
|            |              |              |
|            |              |              |
|            |              |              |
|            |              |              |
-------------|              |              |
|Frame 2     |              |              |
|            |              |              |
|            |              |              |
------------------------------------------


資料來源
W3C
http://www.w3.org/TR/html401/struct/global.html

HTML學習一:HTML 簡介

什麼是 World Wide Web (WWW)?
World Wide Web(www)是一個網路上的訊息資源,他主要依賴以下三種機制:
    1.)A uniform naming scheme for locating resources on the Web (e.g., URIs). 
     一個統一的命名方案,用在網路上定位資源所在。(例如 : URIs)

    2.)Protocols, for access to named resources over the Web (e.g., HTTP). 
    協定,網路上用來存取資源的一種溝通方法。(例如:HTTP)

    3.)Hypertext, for easy navigation among resources (e.g., HTML). 
     超本文,用來對各類資源輕易的導覽。

    URI(Universal Resource Identifier)簡介
    Every resource available on the Web -- HTML document, image, video clip, program, etc. -- has an address that may be encoded by a Universal Resource Identifier, or "URI".


    網頁HTML-Document中每個可用資源,image, video clip, program, etc,
    有一個位址他也許是經過編碼的Universal Resource Identifier或稱URI。


    URI是由下列三個項目構成:
    • The naming scheme of the mechanism used to access the resource.
    • The name of the machine hosting the resource.
    • The name of the resource itself, given as a path. 
    example:
    http://www.w3.org/TR
    http是通訊協定,www.w3.org是Server所在的網路位置,/TR 是機器(Server)上的資料路徑。


    <A href="mailto:jt@gmail.com">JT</A>


    片段識別 (Fragment identifiers)

    http://somesite.com/html/top.html#section_2

    #section_2就是一個片段識別。


    What is HTML?
    • HTML stands for Hyper Text Markup Language
    • HTML is not a programming language, it is a markup language
    • A markup language is a set of markup tags
    • HTML uses markup tags to describe web pages

    2011年11月11日 星期五

    Flex4 TIleLayout 在width 100% 下出現的奇怪的row


    <?xml version="1.0" encoding="utf-8"?>
    <s:Application xmlns:fx="http://ns.adobe.com/mxml/2009" 
    xmlns:s="library://ns.adobe.com/flex/spark" 
    xmlns:mx="library://ns.adobe.com/flex/mx" 
    minWidth="955" minHeight="600">
    <fx:Script>
    <![CDATA[ 
    protected function addItem(event:MouseEvent):void
    { 
    var item:Button = new Button();
    item.label = String(testContainer.numElements);
    item.width = 50;
    item.height = 50;
    testContainer.addElement(item); 
    } 
    
    protected function clearAll(event:MouseEvent):void
    { 
    testContainer.removeAllElements(); 
    }
    
    protected function clearLastItem(event:MouseEvent):void
    {
    if(testContainer.numElements > 0)
    {
    testContainer.removeElementAt(testContainer.numElements - 1); 
    } 
    } 
    ]]>
    </fx:Script>
    <s:controlBarContent>
    <s:Button click="addItem(event)" label="add item"/>
    <s:Button click="clearLastItem(event)" label="clear last "/>
    <s:Button click="clearAll(event)" label="clearAll"/>
    </s:controlBarContent>
    
    
    <s:SkinnableContainer id="testContainer" 
    backgroundColor="0xcccccc" 
    alpha="0.8" 
    width="100%" 
    >
    
    <s:layout> 
    <s:TileLayout id="tileLayout" 
    clipAndEnableScrolling="true" 
    paddingLeft="5"
    paddingRight="5"
    orientation="rows" 
    /> 
    </s:layout> 
    </s:SkinnableContainer> 
    </s:Application>


    一個解決的方式是繼承TileLayout並override updateDisplayList 如下:
    override public function updateDisplayList(unscaledWidth:Number , unscaledHeight:Number):void
      {
       super.updateDisplayList(unscaledWidth , unscaledHeight);
       (target as GroupBase).explicitHeight = Math.ceil(rowCount * (rowHeight + verticalGap) - verticalGap);
      }


    詳細內容請參考:http://forums.adobe.com/thread/565055

    簡單的虛線Components


    這是一個簡單的虛線元件,還未做記憶體管理效率化以及點的大小動態更改處理。
    <?xml version="1.0" encoding="utf-8"?>
    <s:Application xmlns:fx="http://ns.adobe.com/mxml/2009" 
          xmlns:s="library://ns.adobe.com/flex/spark" 
          xmlns:mx="library://ns.adobe.com/flex/mx" minWidth="955" minHeight="600" xmlns:view="ut.view.*">
     <s:VGroup width="100%" paddingTop="5" paddingLeft="5" paddingRight="5">
      <view:DottedLine width="100%" dotteLineMode="line" color="0x0000FF"/>
      <view:DottedLine width="100%" dotteLineMode="dot" color="0x0000FF"/>
      <view:DottedLine width="100" dotteLineMode="line" color="0xFF0000"/>
      <view:DottedLine width="100" dotteLineMode="dot" color="0xFF0000"/> 
     
      <s:HGroup>
       <view:DottedLine width="100" dotteLineMode="dot" color="0xFF0000" rotation="90"/>
       <view:DottedLine width="100" dotteLineMode="line" color="0xFF0000" rotation="90"/>
       <view:DottedLine width="100" dotteLineMode="line" color="0xFF0000" rotation="90"/>
       <view:DottedLine width="100"  dotteLineMode="dot" color="0xFF0000" rotation="90"/>
      </s:HGroup>
     </s:VGroup>
    </s:Application>
    

    package ut.view
    {
     import flash.display.Bitmap;
     import flash.display.BitmapData;
     import flash.display.DisplayObject;
     import flash.display.Graphics;
     import flash.display.Shape;
     import flash.utils.getTimer;
     
     import mx.graphics.BitmapFillMode;
     
     import spark.primitives.BitmapImage;
     
     import ut.enum.DottedLineMode;
     
     public class DottedLine extends BitmapImage
     {  
      public function DottedLine(color:uint = 0xD4D4D4 , dotteLineMode:String=DottedLineMode.DOT)
      {  
       this.color = color
       this.dotteLineMode = dotteLineMode;
        
      }  
        
      private var _color:uint;
      /**虛線的顏色*/
      public function get color():uint
      {
       return _color;
      }
      public function set color(value:uint):void
      { 
       if(_color != value)
       {
        _color = value;
        changeSource();
       }
      }
      
      
      private var _dotteLineMode:String;
      /**選則點或線的虛線,可由DottedLineMode選擇輸入參數*/ 
      [Inspectable(category="General", enumeration="dot,line", defaultValue="stretch")]
      public function get dotteLineMode():String 
      {
       return  _dotteLineMode;
      }  
      public function set dotteLineMode(dottedLineMode:String):void
      {  
       if(dottedLineMode == DottedLineMode.DOT || dottedLineMode == DottedLineMode.LINE)
       {  
        if(_dotteLineMode != dottedLineMode)
        {
         _dotteLineMode = dottedLineMode; 
         changeSource();
        }
       }
      }  
     
      
      /**bitmapImage所要填入source*/
      private function changeSource():void
      {
       switch(dotteLineMode)
       {
        case DottedLineMode.DOT:
         setSource(createDotDotted);
         break;
        case DottedLineMode.LINE:
         setSource(createLineDotteed);
         break;
        default:
         
       }
      }
      
      /**預設為點狀態的虛線*/
      private function setSource(createMethod:Function):void
      { 
       this.source = null;
       this.source = getBitmap(createMethod(color));
       this.fillMode = BitmapFillMode.REPEAT;
      }  
      
     
      /**將畫好的圖轉換成bitmap  (displayObject to bitmap)*/
      private function getBitmap(target:DisplayObject):Bitmap
      {
       var _bitMapData:BitmapData = new BitmapData(target.width , target.height , true  , 0x000000);
        _bitMapData.draw(target);   
       var _bitMap:Bitmap = new Bitmap(_bitMapData);
       return _bitMap;   
      }
      
      
      /**畫兩個圓依照color,其中一個是看不見,如此bitmap在repeat時方有間隔*/
      protected function createDotDotted(color:uint=0xD4D4D4 ,  ellipseX:Number=0 , ellipseY:Number=0 , ellipseWidth:Number=2 , ellipseHeight:Number=2):DisplayObject
      {   
       var grapgics:Shape = new Shape();
        //first ellipse alpha is 1
        grapgics.graphics.beginFill(color);
        grapgics.graphics.drawEllipse(ellipseX , ellipseY , ellipseWidth , ellipseHeight);     
        //second ellipse alpha is 0 
        grapgics.graphics.beginFill(0xFFFFFF , 0);
        grapgics.graphics.drawEllipse(ellipseX+ellipseWidth , ellipseY , ellipseWidth , ellipseHeight);
        //end fill
        grapgics.graphics.endFill();
       return grapgics;
      }
      
      /**畫兩個線段*/
      protected function createLineDotteed(color:uint=0xD4D4D4 ,  rectX:Number=0 , rectY:Number=0 , rectWidth:Number=3 , rectHeight:Number=1):DisplayObject
      {
       var grapgics:Shape = new Shape();
       //first line
       grapgics.graphics.beginFill(color);
       grapgics.graphics.drawRect(rectX , rectY , rectWidth , rectHeight);   
       //second line
       grapgics.graphics.beginFill(0xFFFFFF , 0);
       grapgics.graphics.drawRect( rectX + rectWidth , rectY , rectWidth , rectHeight);
       //end fill 
       grapgics.graphics.endFill();
       return grapgics; 
      }
     }
    }


    package ut.enum
    {
     public class DottedLineMode
     {
      static public const DOT:String =  "dot";
      static public const LINE:String = "line";
      public function DottedLineMode()
      {
      }
     }
    }
    

    Flex4 Rect and Style Metadata


    有時候Layout時只是想用到border或是只想要用到BackgroundColor的時候可以考慮在Group中使用Rect,並加上Style Medatata就可以達到而不用使用到SkinnableContner或是BorderContainer,用法如下。

    <?xml version="1.0" encoding="utf-8"?>
    <s:Application xmlns:fx="http://ns.adobe.com/mxml/2009" 
          xmlns:s="library://ns.adobe.com/flex/spark" 
          xmlns:mx="library://ns.adobe.com/flex/mx" 
          minWidth="955" minHeight="600"    
          xmlns:itemrenderers="itemrenderers.*"
          >
     <fx:Style source="css/Test.css"/>
     <s:HGroup paddingTop="5" paddingBottom="5" paddingLeft="5" paddingRight="5">  
      <itemrenderers:Rect_Style_BackgroundColor width="200" height="200"/>
      <itemrenderers:Rect_Style_Border width="200" height="200"/>  
     </s:HGroup> 
    </s:Application>


    <?xml version="1.0" encoding="utf-8"?>
    <s:Group xmlns:fx="http://ns.adobe.com/mxml/2009" 
       xmlns:s="library://ns.adobe.com/flex/spark" 
       xmlns:mx="library://ns.adobe.com/flex/mx"
       >
     <fx:Metadata>
      [Style(name="backgroundColors", inherit="no", type="uint" ,  theme="spark")]
     </fx:Metadata>
     <fx:Script>
      <![CDATA[
       import mx.events.FlexEvent;
       
       override public function styleChanged(styleProp:String):void
       {
        super.styleChanged(styleProp);
        if(styleProp == "backgroundColors")
        {
         invalidateDisplayList();
        }
       }
       
       override protected function updateDisplayList(unscaledWidth:Number, unscaledHeight:Number):void
       {
        super.updateDisplayList(unscaledWidth, unscaledHeight);
        myBackgroundColor.color = getStyle("backgroundColors");
       }
        
      ]]>
     </fx:Script>
     <s:Rect left="0" right="0" top="0" bottom="0">
      <s:fill>
       <s:SolidColor id="myBackgroundColor" color="0x00ff00"/>
      </s:fill>
     </s:Rect>
    </s:Group>


    <?xml version="1.0" encoding="utf-8"?>
    <s:Group xmlns:fx="http://ns.adobe.com/mxml/2009" 
       xmlns:s="library://ns.adobe.com/flex/spark" 
       xmlns:mx="library://ns.adobe.com/flex/mx"
       width="100%"
       >
     <fx:Metadata>
      [Style(name="borders", inherit="no", type="uint")]
     </fx:Metadata>
     
     <fx:Script>
      <![CDATA[
       import mx.events.FlexEvent;
       
       override public function styleChanged(styleProp:String):void
       {
        super.styleChanged(styleProp);
        if(styleProp == "borders")
        {
         invalidateDisplayList();
        }
       }
       
       override protected function updateDisplayList(unscaledWidth:Number, unscaledHeight:Number):void
       {
        super.updateDisplayList(unscaledWidth, unscaledHeight);
        myBorder.color = getStyle("borders");
       }
       
      ]]>
     </fx:Script> 
     <s:Rect 
       left="0" right="0" top="0" bottom="0"
       radiusX="5" radiusY="5">
      <s:stroke>   
       <s:SolidColorStroke id="myBorder"  weight="2" color="0x00ff00"/>
      </s:stroke>
     </s:Rect> 
    </s:Group>


    /* CSS file */
    @namespace s "library://ns.adobe.com/flex/spark";
    @namespace mx "library://ns.adobe.com/flex/mx";
    @namespace itemrenderers "itemrenderers.*";
    @namespace spark "spark.skins.spark.*";
    
    
    itemrenderers|Rect_Style_BackgroundColor
    {
     backgroundColors:#f63b5e;
    }
    
    itemrenderers|Rect_Style_Border
    {
     borders:#3e95ef;
    }
    

    SWF在google瀏覽器下無法切換輸入法

    問題:Flash / Flex SWF在google瀏覽器下無法做輸入法切換
    平台: Windows7
    瀏覽器:chrome 15.0.874.106 m

    解決方法:
    1.在chrome網址列中輸入chrome://plugins/打開plugins頁面。
    2.點擊詳細資訊
    3.在flashPlayer項目中將gcswf32.dll項目關閉,留下NPSWF32.dll啟動。
    PS.若你有手動安裝過flashPlayer會有NPSWF32.dll,若沒有到Adobe下載安裝即可。

    2011年5月27日 星期五

    亂數round


    亂數數值範圍:
    (Math.round( Math.random() * ( maxValue - minValue )) + minValue);
    //產生1 ~ 10之間的亂數
    var num:uint = Math.round( Math.random() * ( 10 - 1 )) + 1; 


    亂數色彩:
    //產生隨機色彩
    var color:uint = Math.random() * 0xFFFFFF;
    

    除了R其餘使用亂數:
    0xff << 24 | 0xff * Math.random() << 16 | 0xff * Math.random() << 8 | 0xff
    

    2011年5月26日 星期四

    new Object VS { } 與 new Array( ) VS [ ]


    測試程式碼:
    <?xml version="1.0" encoding="utf-8"?>
    <s:Application xmlns:fx="http://ns.adobe.com/mxml/2009" 
          xmlns:s="library://ns.adobe.com/flex/spark" 
          xmlns:mx="library://ns.adobe.com/flex/mx" 
          minWidth="955" minHeight="600"
          applicationComplete="completeHandler()"
          >
     <fx:Script>
      <![CDATA[
        
       private var count:int;
       private var beforeTime:int;
       private var afterTime:int;
       private var object:Object;
       private var array:Array;
       private const REPS:int = 1000000;
       
       private var enableBtn:Boolean;
       protected function completeHandler():void
       {    
        enableBtn = true;    
       }
       
       protected function get executionTime():String
       {
        return (afterTime-beforeTime).toString();
       }
    
       
       protected function button1_mouseDownHandler(event:MouseEvent):void
       { 
        if(!enableBtn)return;
        enableBtn = false; 
        beforeTime = getTimer();
        for (count = 0; count < REPS; count++)
        {
         object = {};
        }
        afterTime = getTimer();
        log0.text = executionTime;
        enableBtn = true; 
       }
       
       protected function button2_mouseDownHandler(event:MouseEvent):void
       { 
        if(!enableBtn)return;
        enableBtn = false; 
        beforeTime = getTimer();
        for (count = 0; count < REPS; count++)
        {
         object = new Object();
        }
        afterTime = getTimer();
        log1.text = executionTime;
        enableBtn = true; 
       }
       
       protected function button3_mouseDownHandler(event:MouseEvent):void
       { 
        if(!enableBtn)return;
        enableBtn = false; 
        beforeTime = getTimer();
        for (count = 0; count < REPS; count++)
        {
         array = [1,2,3];
        }
        afterTime = getTimer();
        log2.text = executionTime;
        enableBtn = true; 
       }
       
       protected function button4_mouseDownHandler(event:MouseEvent):void
       { 
        if(!enableBtn)return;
        enableBtn = false; 
        beforeTime = getTimer();
        for (count = 0; count < REPS; count++)
        {
         array = new Array(1,2,3);
        }
        afterTime = getTimer();
        log3.text = executionTime;
        enableBtn = true; 
       }
       
      ]]>
     </fx:Script> 
     <s:HGroup>
      <s:Panel width="200" height="150" title="\{\}"> 
       <s:layout>
        <s:VerticalLayout/>
       </s:layout>
       <s:TextArea id="log0" width="100%" height="100%"/> 
       <s:Button label="start" mouseDown="button1_mouseDownHandler(event)"/>
      </s:Panel>
      <s:Panel width="200" height="150" title="new Object">   
       <s:layout>
        <s:VerticalLayout/>
       </s:layout>
       <s:TextArea id="log1" width="100%" height="100%"/>
       <s:Button label="start" mouseDown="button2_mouseDownHandler(event)"/&gt;
      </s:Panel>
      <s:Panel width="200" height="150" title="[1,2,3]">   
       <s:layout>
        <s:VerticalLayout/>
       </s:layout>
       <s:TextArea id="log2" width="100%" height="100%"/>
       <s:Button label="start" mouseDown="button3_mouseDownHandler(event)"/>
      </s:Panel>
      <s:Panel width="200" height="150" title="new Array(1,2,3)">   
       <s:layout>
        <s:VerticalLayout/>
       </s:layout>
       <s:TextArea id="log3" width="100%" height="100%"/>
       <s:Button label="start" mouseDown="button4_mouseDownHandler(event)"/>
      </s:Panel>
     </s:HGroup> 
    </s:Application>


    //結果


    new Object( )   < {}

    new Array(1,2,3)   >  [1,2,3]

    //性能概要分析

    IconFile metadata tag


    原文引用自adobe flex4.5 help手冊:
    原文:


    • Use the  [IconFile]  metadata tag to identify the filename for the icon that represents the component in the Insert bar of Flash Builder.
    功用說明:
    • 讓自己設計的組件使用指定的小圖示顯示於FlashBulider的Components View中。
    • 可以使用的資源有PNG、GIF、JPG。


    使用範例:
    //測試的Class
    package com.test.icon
    {
     import spark.components.Button;
     import spark.components.Group;
     import spark.components.TextArea;
     import spark.layouts.VerticalLayout;
     import spark.layouts.supportClasses.LayoutBase;
     
     [IconFile("MyPanel.png")]
     public class MyPanel extends Group
     {  
      public function MyPanel()
      {
       super();
       this.layout = new  VerticalLayout();
      }
      
      override protected function createChildren():void
      {
       super.createChildren();
       if(button == null){
        this.button = new Button();
        this.button.label = "AS";
       }
       
       if(textArea == null){
        this.textArea = new TextArea();
       }   
       this.addElement(button);
       this.addElement(textArea);
      } 
      
      override protected function commitProperties():void
      {
       super.commitProperties();
       if(textAreaChanged==true && textArea!=null)
       {
        textArea.percentWidth = 100;
       }
       if(btnChanged == true && button!=null)
       {
        button.width = 80;  
       }
      }
      
      override protected function measure():void
      {
       super.measure();
      }
      
      override public function set layout(value:LayoutBase):void
      {
       if(super.layout != value)
       {
        super.layout = value;   
       }
      }
      
      private var textAreaChanged:Boolean;
      private var _textArea:TextArea;
      public function get textArea():TextArea
      {
       return _textArea;
      }
      public function set textArea(value:TextArea):void
      {
       if( _textArea != value)
       {
        _textArea = value;
        textAreaChanged = true;
        invalidateProperties();
       }
      }
      
      private var btnChanged:Boolean;
      private var _button:Button;
      public function get button():Button
      {
       return _button;
      }
      public function set button(value:Button):void
      {
       if( _button != value)
       {
        _button = value;
        btnChanged = true;
        invalidateProperties();
       }
      }  
     }
    }

    <?xml version="1.0" encoding="utf-8"?>
    <s:Application xmlns:fx="http://ns.adobe.com/mxml/2009" 
          xmlns:s="library://ns.adobe.com/flex/spark" 
          xmlns:mx="library://ns.adobe.com/flex/mx" minWidth="955" minHeight="600"
          xmlns:icon="com.test.icon.*"
          >
     
     <icon:MyPanel width="300">
      <icon:button>
       <s:Button label="MXML"/>
      </icon:button>
     </icon:MyPanel> 
    </s:Application>


    結果我怎麼試Icon他就是出不來,我懷疑是不是path錯誤,改了絕對路徑、相對路徑都不行,然後我找尋flex4.5 SDK內的Button.png來驗證Flex本身的Icon圖片放在哪,結果發現是與Class同目錄,因此我也照做,還是不行,最後開了一個獨立的lib庫項目,在專案中引入lib項目就OK了。

    因此實際檔案結構如下:
    //獨立的lib庫


    //Flex測試用的專案


    //Flex測試專案中,將將lib加入(使用添加項目)。

    如此就可以在組件窗口看到設定的ICON

    • 注意,使用IconFile必須將Class至於獨立的庫項目才能成功。
    • 由查詢SDK中的Button.png得知,預設的圖片使用解析度是18 * 18。