2011年5月27日 星期五

亂數round


亂數數值範圍:
(Math.round( Math.random() * ( maxValue - minValue )) + minValue);
//產生1 ~ 10之間的亂數
var num:uint = Math.round( Math.random() * ( 10 - 1 )) + 1; 


亂數色彩:
//產生隨機色彩
var color:uint = Math.random() * 0xFFFFFF;

除了R其餘使用亂數:
0xff << 24 | 0xff * Math.random() << 16 | 0xff * Math.random() << 8 | 0xff

2011年5月26日 星期四

new Object VS { } 與 new Array( ) VS [ ]


測試程式碼:
<?xml version="1.0" encoding="utf-8"?>
<s:Application xmlns:fx="http://ns.adobe.com/mxml/2009" 
      xmlns:s="library://ns.adobe.com/flex/spark" 
      xmlns:mx="library://ns.adobe.com/flex/mx" 
      minWidth="955" minHeight="600"
      applicationComplete="completeHandler()"
      >
 <fx:Script>
  <![CDATA[
    
   private var count:int;
   private var beforeTime:int;
   private var afterTime:int;
   private var object:Object;
   private var array:Array;
   private const REPS:int = 1000000;
   
   private var enableBtn:Boolean;
   protected function completeHandler():void
   {    
    enableBtn = true;    
   }
   
   protected function get executionTime():String
   {
    return (afterTime-beforeTime).toString();
   }

   
   protected function button1_mouseDownHandler(event:MouseEvent):void
   { 
    if(!enableBtn)return;
    enableBtn = false; 
    beforeTime = getTimer();
    for (count = 0; count < REPS; count++)
    {
     object = {};
    }
    afterTime = getTimer();
    log0.text = executionTime;
    enableBtn = true; 
   }
   
   protected function button2_mouseDownHandler(event:MouseEvent):void
   { 
    if(!enableBtn)return;
    enableBtn = false; 
    beforeTime = getTimer();
    for (count = 0; count < REPS; count++)
    {
     object = new Object();
    }
    afterTime = getTimer();
    log1.text = executionTime;
    enableBtn = true; 
   }
   
   protected function button3_mouseDownHandler(event:MouseEvent):void
   { 
    if(!enableBtn)return;
    enableBtn = false; 
    beforeTime = getTimer();
    for (count = 0; count < REPS; count++)
    {
     array = [1,2,3];
    }
    afterTime = getTimer();
    log2.text = executionTime;
    enableBtn = true; 
   }
   
   protected function button4_mouseDownHandler(event:MouseEvent):void
   { 
    if(!enableBtn)return;
    enableBtn = false; 
    beforeTime = getTimer();
    for (count = 0; count < REPS; count++)
    {
     array = new Array(1,2,3);
    }
    afterTime = getTimer();
    log3.text = executionTime;
    enableBtn = true; 
   }
   
  ]]>
 </fx:Script> 
 <s:HGroup>
  <s:Panel width="200" height="150" title="\{\}"> 
   <s:layout>
    <s:VerticalLayout/>
   </s:layout>
   <s:TextArea id="log0" width="100%" height="100%"/> 
   <s:Button label="start" mouseDown="button1_mouseDownHandler(event)"/>
  </s:Panel>
  <s:Panel width="200" height="150" title="new Object">   
   <s:layout>
    <s:VerticalLayout/>
   </s:layout>
   <s:TextArea id="log1" width="100%" height="100%"/>
   <s:Button label="start" mouseDown="button2_mouseDownHandler(event)"/&gt;
  </s:Panel>
  <s:Panel width="200" height="150" title="[1,2,3]">   
   <s:layout>
    <s:VerticalLayout/>
   </s:layout>
   <s:TextArea id="log2" width="100%" height="100%"/>
   <s:Button label="start" mouseDown="button3_mouseDownHandler(event)"/>
  </s:Panel>
  <s:Panel width="200" height="150" title="new Array(1,2,3)">   
   <s:layout>
    <s:VerticalLayout/>
   </s:layout>
   <s:TextArea id="log3" width="100%" height="100%"/>
   <s:Button label="start" mouseDown="button4_mouseDownHandler(event)"/>
  </s:Panel>
 </s:HGroup> 
</s:Application>


//結果


new Object( )   < {}

new Array(1,2,3)   >  [1,2,3]

//性能概要分析

IconFile metadata tag


原文引用自adobe flex4.5 help手冊:
原文:


  • Use the  [IconFile]  metadata tag to identify the filename for the icon that represents the component in the Insert bar of Flash Builder.
功用說明:
  • 讓自己設計的組件使用指定的小圖示顯示於FlashBulider的Components View中。
  • 可以使用的資源有PNG、GIF、JPG。


使用範例:
//測試的Class
package com.test.icon
{
 import spark.components.Button;
 import spark.components.Group;
 import spark.components.TextArea;
 import spark.layouts.VerticalLayout;
 import spark.layouts.supportClasses.LayoutBase;
 
 [IconFile("MyPanel.png")]
 public class MyPanel extends Group
 {  
  public function MyPanel()
  {
   super();
   this.layout = new  VerticalLayout();
  }
  
  override protected function createChildren():void
  {
   super.createChildren();
   if(button == null){
    this.button = new Button();
    this.button.label = "AS";
   }
   
   if(textArea == null){
    this.textArea = new TextArea();
   }   
   this.addElement(button);
   this.addElement(textArea);
  } 
  
  override protected function commitProperties():void
  {
   super.commitProperties();
   if(textAreaChanged==true && textArea!=null)
   {
    textArea.percentWidth = 100;
   }
   if(btnChanged == true && button!=null)
   {
    button.width = 80;  
   }
  }
  
  override protected function measure():void
  {
   super.measure();
  }
  
  override public function set layout(value:LayoutBase):void
  {
   if(super.layout != value)
   {
    super.layout = value;   
   }
  }
  
  private var textAreaChanged:Boolean;
  private var _textArea:TextArea;
  public function get textArea():TextArea
  {
   return _textArea;
  }
  public function set textArea(value:TextArea):void
  {
   if( _textArea != value)
   {
    _textArea = value;
    textAreaChanged = true;
    invalidateProperties();
   }
  }
  
  private var btnChanged:Boolean;
  private var _button:Button;
  public function get button():Button
  {
   return _button;
  }
  public function set button(value:Button):void
  {
   if( _button != value)
   {
    _button = value;
    btnChanged = true;
    invalidateProperties();
   }
  }  
 }
}

<?xml version="1.0" encoding="utf-8"?>
<s:Application xmlns:fx="http://ns.adobe.com/mxml/2009" 
      xmlns:s="library://ns.adobe.com/flex/spark" 
      xmlns:mx="library://ns.adobe.com/flex/mx" minWidth="955" minHeight="600"
      xmlns:icon="com.test.icon.*"
      >
 
 <icon:MyPanel width="300">
  <icon:button>
   <s:Button label="MXML"/>
  </icon:button>
 </icon:MyPanel> 
</s:Application>


結果我怎麼試Icon他就是出不來,我懷疑是不是path錯誤,改了絕對路徑、相對路徑都不行,然後我找尋flex4.5 SDK內的Button.png來驗證Flex本身的Icon圖片放在哪,結果發現是與Class同目錄,因此我也照做,還是不行,最後開了一個獨立的lib庫項目,在專案中引入lib項目就OK了。

因此實際檔案結構如下:
//獨立的lib庫


//Flex測試用的專案


//Flex測試專案中,將將lib加入(使用添加項目)。

如此就可以在組件窗口看到設定的ICON

  • 注意,使用IconFile必須將Class至於獨立的庫項目才能成功。
  • 由查詢SDK中的Button.png得知,預設的圖片使用解析度是18 * 18。

2011年5月25日 星期三

Alternative metadata tag


原文引用自Adobe Flex4.5_help手冊:
原文:

If you want to replace one class with another, mark the class to be replaced with the  [Alternative]  metadata tag. The
[Alternative]  metadata tag specifies the replacement class, and a version number that indicates when the
replacement occurred.

功用說明:
[Alternative]這個metadata標籤用於建議替代的類別與版本,如mx的Button會出現建議使用spark的Button,而在FlashBulider選用Class時可以看到如下圖訊息。


使用範例:
//舊的Cat Class
package com.jef
{
 [Alternative(replacement="com.jt.Cat", since="1.0")]
 /***/ //使用asDoc的註解,說明的asDoc才會出現
 public class Cat
 {
  public function Cat()
  {
  }
 }
}

//新的Cat Class
package com.jt
{
 public class Cat
 {
  public function Cat()
  {
  }
 }
}

//Flex mxml
<?xml version="1.0" encoding="utf-8"?>
<s:Application xmlns:fx="http://ns.adobe.com/mxml/2009" 
      xmlns:s="library://ns.adobe.com/flex/spark" 
      xmlns:mx="library://ns.adobe.com/flex/mx" 
      minWidth="955" minHeight="600"
      applicationComplete="completeHandler(event)"
      >
 <fx:Script>
  <![CDATA[
   import com.jef.Cat;   
   import mx.events.FlexEvent;   
   protected function completeHandler(event:FlexEvent):void
   { 
    var cat:Cat;
   }   
  ]]>
 </fx:Script> 
</s:Application>

出現提示如下:


Alternative與Deprecated不同,Alternative原本的Class還可使用,只是有更新版本建議使用,而Deprecated則是說明該Class已經廢棄不要再使用。

2011年5月21日 星期六

Flex Remote mapping value Object (Flex 值物件映射)


Mapping Value Object
上次我們在Linux中測試過BlazeDS AMF的remote功能,現在我們來試試看在BlazeDS中的Remote Server回傳的Value Object 來映射 Flex端的Value Object。

ActionScript可使用flash.net.registerClassAlias來做Mapping Value Object:
  • registerClassAlias( "remote端 value object Class path" ,  flash端 value object Class path);
Flex中可使用MetaData tags(後設標籤) 來做Mapping Value Object:
  • [RemoteClass(alias="value object Class path")]
Remote端配置:
Setp1.撰寫Remote端的值物件SongData

//JAVA SongData (值物件)
package com.jt.valueObject;
public class SongData 
{ 
 public SongData()
 {
  super();
 }

 private String _name;
 public String getName() 
 {
  return _name;
 }
 public void setName(String name) 
 {
  _name = name;
 }

 private String _vocalist; 
 public String getVocalist() 
 {
  return _vocalist;
 }
 public void setVocalist(String vocalist) 
 {
  _vocalist = vocalist;
 }

 private String _type; 
 public String getType() 
 {
  return _type;
 }
 public void setType(String type) 
 {
  _type = type;
 }

 private int _length;
 public int getLength() 
 {
  return _length;
 }
 public void setLength(int length) 
 {
  _length = length;
 } 
}


Step2.撰寫Remote Service的類別SongService
//JAVA SongService (服務呼叫API)
package com.jt.remote;
import com.jt.valueObject.SongData;
public class SongService 
{
 public SongService()
 {
  super();
 }
 
 public SongData getSongData()
 {
  SongData data = new SongData();
  data.setName("誰公平");
  data.setVocalist("李威");
  data.setType("Top");
  data.setLength(30000);
  return data;  
 }
}


檔案結構如下圖:


Step3.編譯SongService.java與SongData.java
  • 在你使用Eclipse會幫你編譯這兩隻檔案,你也可以使用命令模式java-d編譯檔案。
  • 命令模式在所在路徑在src時 :
    • javac -d ../classes com/jt/remote/SongService.java
    • javac -d ../classes com/jt/valueObject/SongData.java
Step4.將SongData.class與SongService.class配置到BlazeDS的位置上

  • 將SongService.class放至/opt/tomcat6/webapps/blazedsAMF/WEB-INF/classes/com/jt/remote
  • 將SongData.class放至/opt/tomcat6/webapps/blazedsAMF/WEB-INF/classes/com/jt/valueObject
PS.這是照之前Linux上配置BlazeDS的設定,因此路徑會是這樣,實際請依你的配置路徑,在WEB-INF/classes底下的路徑就是你JAVA的package設定。


Step5.設定BlazeDS的配置檔remoting-config.xml
  • 如果你是跟著我Linux配置BlazeDS文章的話路徑會在opt/tomcat6/webapps/blazedsAMF/WEB-INF/flex/remoting-config.xml
  • sudo gedit opt/tomcat6/webapps/blazedsAMF/WEB-INF/flex/remoting-config.xml
在檔案內容中加入:
<destination id="Remote_GetSong">
  <properties>  
     <source>com.jt.remote.SongService</source>
  </properties>
</destination>

Step6.撰寫Flex程式來測試Mapping
//Flex的值物件SongData ,請參考JAVA中的SongData做比較
package com.jt.valueObject
{ 
 //mapping,alias是指java中valueObject Class的所在路徑。
        [RemoteClass(alias="com.jt.valueObject.SongData")]
 public class SongData
 {
  public function SongData()
  {
   super();
  }
  
  private var _name:String;
  public function get name():String
  {
   return _name;
  }
  public function set name(value:String):void
  {
   if( _name != value)
   {
    _name = value;
   }
  }
  
  private var _vocalist:String;
  public function get vocalist():String
  {
   return _vocalist;
  }
  public function set vocalist(value:String):void
  {
   if( _vocalist != value)
   {
    _vocalist = value;
   }
  }
  
  private var _type:String;
  public function get type():String
  {
   return _type;
  }
  public function set type(value:String):void
  {
   if( _type != value)
   {
    _type = value;
   }
  }
  
  private var _length:int;
  public function get length():int
  {
   return _length;
  }
  public function set length(value:int):void
  {
   if( _length != value)
   {
    _length = value;
   }
  }  
 }
}

//Flex的應用程式
<?xml version="1.0" encoding="utf-8"?>
<s:Application xmlns:fx="http://ns.adobe.com/mxml/2009" 
      xmlns:s="library://ns.adobe.com/flex/spark" 
      xmlns:mx="library://ns.adobe.com/flex/mx" 
      minWidth="955" minHeight="600"
      applicationComplete="completeHandler(event)"
      >
 <s:layout>
  <s:HorizontalLayout/>
 </s:layout>
 <fx:Script>
  <![CDATA[
   import com.jt.valueObject.SongData;
   
   import flash.net.registerClassAlias;
   
   import mx.events.FlexEvent;
   import mx.messaging.ChannelSet;
   import mx.messaging.channels.AMFChannel;
   import mx.rpc.events.FaultEvent;
   import mx.rpc.events.ResultEvent;
   import mx.rpc.remoting.Operation;
   import mx.rpc.remoting.RemoteObject;
   
   //Remote Operation
   private var _channelSet:ChannelSet;
   private var _amfChannel:AMFChannel;
   
   private var _remoteObject:RemoteObject;  
   private var _operation:Operation;  
   private var _data:Object;   
   
   protected function completeHandler(event:FlexEvent):void
   { 
    
    //as3方式設定mapping (java值物件路徑 , as3值物件類)
    //registerClassAlias("com.jt.valueObject.SongData", SongData);
    initRemoteData();
    initRemoteOpertion();   
    initBtnListener();  
   }   
   private function initRemoteData():void
   {
    _data  = createRemoteData();    
   }   
   protected function createRemoteData():Object
   {    
    var data:Object = new Object();  
    //blazeds的AMF Server Service服務位址
    data.uri = "http://127.0.0.1:8400/blazedsAMF/messagebroker/amf";            
    data.channelSetID = "my-amf"; 
    //服務程式來源path(由classes之後算起) 
    data.source = "com.jt.remote.SongService"; 
    //操作method名稱 
    data.name = "getSongData";  
    data.destination = "Remote_GetSong"; 
    return data;
   }   
   
   private function initRemoteOpertion():void
   {
    initChannelSet();
    initAMFChannel();
    addChannel();
    initRemoteObject();
    initOperation();
    afterInitOPeration();
   }   
   private function initChannelSet():void
   {    
    _channelSet = new ChannelSet(); 
   }
   private function initAMFChannel():void
   {
    _amfChannel = new AMFChannel(_data.channelSetID , _data.uri); 
   }
   private function addChannel():void
   {
    _channelSet.addChannel(_amfChannel); 
   }
   private function initRemoteObject():void
   {    
    _remoteObject = new RemoteObject();
    _remoteObject.destination = _data.destination;
    _remoteObject.channelSet = _channelSet; 
    _remoteObject.source  = _data.source;    
   }
   
   private function initOperation():void
   {    
    _operation = new Operation();
    _operation.name = _data.name;      
   }
   private function afterInitOPeration():void
   {
    _remoteObject.operations  = {getSongData:_operation};    
    _remoteObject.addEventListener(ResultEvent.RESULT , onResult);
    _remoteObject.addEventListener(FaultEvent.FAULT , onFault);      
   }    
   
   protected function onResult(e:ResultEvent):void
   { 
    var v:SongData; //有這行 ,後設標籤的mapping就會成功, 如果沒有這行 就沒辦法mapping,很怪異。    
    output.text = e.result.toString();
   }
   
   protected function onFault(e:FaultEvent):void
   { 
    output.text = "Remote失敗";
   }   
   
   private function initBtnListener():void
   {
    btn.addEventListener(MouseEvent.MOUSE_DOWN , callGetSongData);    
   }   
   protected function callGetSongData(event:MouseEvent):void
   { 
    _remoteObject.getSongData();    
   }     
  ]]>
 </fx:Script> 
 <s:Panel width="300" height="200" title="ValueTest">
  <s:layout>
   <s:VerticalLayout/>
  </s:layout>  
   <s:TextArea id="output" width="100%" height="100%"/>        
 </s:Panel>
 <s:Button id="btn" label="call getSongData"/> 
</s:Application>


  • 執行應用程式前記得,要把tomcat運作起來
  • 我們在onResult(e:ResultEvent)中下斷點以便觀察e.result
  • 執行應用程式
  • 點擊瀏覽畫面上的Button
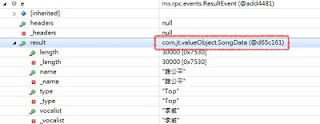
我們可以看到,e.result為一個SongData,代表mapping成功


然後我們將onResult(e:ResultEvent)中的var v:SongData;給註解掉,然後再執行一次應用程式,你會發現e.result竟然變成ObjectProxy了,代表mapping失敗。


至於為什麼會這樣,目前還不知道,但若使用flash.net.registerClassAlias來做mapping則沒有這樣的問題。

registerClassAlias的用法:
  • registerClassAlias("com.jt.valueObject.SongData", SongData);
第一個參數是Remote端中,值物件的所在路徑。
第二個參數是Flex端中,值物件的類。

registerClassAlias方式是flashPlayer API因此flash、Flex都可使用。

你可以將應用程式中的registerClassAlias("com.jt.valueObject.SongData", SongData);拿掉註解,然後將SongData的[RemoteClass(alias="com.jt.valueObject.SongData")]註解掉,測試一下。

Code Block 模板


code style

2011年5月18日 星期三

Linux上配置Blaze

連結資料:
BlazeDS來源網站連結參考
BlazeDS請於Adobe Open Source網站下載
BlazeDS下載首頁,可選擇一般檔案下載或原碼下載(SVN)。
BlazeDS一般檔案下載頁
BlazeDS Source Code下載頁
這篇文章將會使用一般檔案安裝。

安裝步驟:
Step1.配置JDK環境
請參考
    Ubuntu 10.04是預設是使用open java,如果要程式開發想使用Sun Java請參考install Sun JAVA。

    Step2.下載BlazeDS
    如圖:


    • 點擊後會進入Adobe下載頁面,輸入你在Adobe註冊的帳號與密碼。
    • 登入完畢後會出現BlazeDS的使用條款,點擊IAgree(我同意)。
    • 選擇Binary Distribution版本下載(這個版本沒有內含Tomcat,因為我們選擇自己安裝Tomcat)。 
         
     
    下載頁面也有列出BlazeDS的技術支援表:
    BlazeDS不支援Hibernate adapter,但有支援Spring
     
    在ubuntu使用firefox下載完後檔案會預設存放在home/Downloads裡面
     
    Step3.將BlazeDS解壓縮(解ZIP)
    • /~Downloads$ unzip blazeds-bin-4.0.0.14931.zip
    解開後得到blazeds.war

    Step4.將blazeds.war放置tomcat6中的webapps目錄下
    tomcat6預設上會將war解壓
    webapps是tomcat6預設的web資料夾位置
    • /~Downloads$ sudo mv blazeds.war /opt/tomcat6/webapps
    執行後將會得到一個blazeds資料夾

    Step5.修改blazeds名稱成為blazedsAMF

    • /opt/tomcat6/webapps$ sudo mv blazeds blazedsAMF
    Step6.將blazeds.war從webapps中刪除
    • /opt/tomcat6/webapps$ sudo rm blazeds.war

    Step7.利用Eclipse開啟java專案 (這個檔案沒有使用servlet)
    • 新增一專案,名稱remoteUT
    • 新增一packagecom.jt.remote
    • 新增一檔案,Hello.java
    結構如下:


    Step7.建立Hello.java程式內容
    package com.jt.remote;
    public class Hello
    {
     public Hello()
     {
      super();
     }
     public String getHello()
     {
      return "Hello World";
     }
     //test private
     private String getPackage()
     {
      return "com.jt.remote";
     }
     public String echoHello(String value)
     {
      return value + "Hello World";
     }
    }

    Step8.將remoteUT裡的src複製到blazedsAMF/WEB-INF/src底下
    • ~/workspace$ cp -a -r remoteUT/src/com /opt/tomcat6/webapps/blazedsAMF/WEB-INF/src/
    Step9.編譯Hello.java
    • ubuntu:/opt/tomcat6/webapps/blazedsAMF/WEB-INF/src$
      javac -d ../classes com/jt/remote/Hello.java

      編譯完成,可以在WEB-INF/classes中看見com/jt/remote/Hello.class
    Step10.配置remoting-config.xml
    • sudo gedit /opt/tomcat6/webapps/blazedsAMF/WEB-INF/flex/remoting-config.xml
    在<service>之間加入:

    <destination id="Remote_SayHello">
       <properties>
         <source>com.jt.remote.Hello</source>
       </properties>
    </destination>


    Step11.重新啟動Tomcat
    • /opt/tomcat6/bin$ ./startup.sh
    Step12.寫一個Flex來測試功能
    <?xml version="1.0" encoding="utf-8"?>
    <s:Application xmlns:fx="http://ns.adobe.com/mxml/2009"
          xmlns:s="library://ns.adobe.com/flex/spark"
          xmlns:mx="library://ns.adobe.com/flex/mx"
          minWidth="955" minHeight="600"
          applicationComplete="completeHandler(event)"
          >
     <s:layout>
      <s:HorizontalLayout/>
     </s:layout>
     <fx:Script>
      <![CDATA[
       import mx.events.FlexEvent;
       import mx.messaging.ChannelSet;
       import mx.messaging.channels.AMFChannel;
       import mx.rpc.events.FaultEvent;
       import mx.rpc.events.ResultEvent;
       import mx.rpc.remoting.Operation;
       import mx.rpc.remoting.RemoteObject;
     
       //Remote Operation
       private var _channelSet:ChannelSet;
       private var _amfChannel:AMFChannel;
     
       private var _getHelloRemoteObject:RemoteObject;
       private var _echoHelloRemoteObject:RemoteObject;
     
       private var _getHelloOperation:Operation;
       private var _echoHelloOperation:Operation;
     
       private var _getHelloData:Object;
       private var _echoHelloData:Object;  
       protected function completeHandler(event:FlexEvent):void
       {
        initRemoteData();
        initRemoteOpertion();    
        initBtnListener();
       }
     
       private function initRemoteData():void
       {
        _getHelloData  = createRemoteData("getHello");
        _echoHelloData = createRemoteData("echoHello");
       } 
       protected function createRemoteData(methodName:String):Object
       {  
        var data:Object = new Object(); 
        //blazeds的AMF Server Service服務位址
        data.uri = "http://192.168.2.103:8400/blazedsAMF/messagebroker/amf";            
        data.channelSetID = "my-amf";
        //服務程式來源path(由classes之後算起)
        data.source = "com.jt.remote.Hello";
        //操作method名稱
        data.name = methodName;   
        data.destination = "Remote_SayHello";
        return data;
       } 
     
       private function initRemoteOpertion():void
       {
        initChannelSet();
        initAMFChannel();
        addChannel();
        initRemoteObject();
        initOperation();
        afterInitOPeration();
       } 
       private function initChannelSet():void
       {  
        _channelSet = new ChannelSet();
       }
       private function initAMFChannel():void
       {
        _amfChannel = new AMFChannel(_getHelloData.channelSetID , _getHelloData.uri);
       }
       private function addChannel():void
       {
        _channelSet.addChannel(_amfChannel);
       }
       private function initRemoteObject():void
       {  
        _getHelloRemoteObject = new RemoteObject();
        _getHelloRemoteObject.destination = _getHelloData.destination;
        _getHelloRemoteObject.channelSet = _channelSet;
        _getHelloRemoteObject.source  = _getHelloData.source;
      
        _echoHelloRemoteObject = new RemoteObject();
        _echoHelloRemoteObject.destination = _echoHelloData.destination;
        _echoHelloRemoteObject.channelSet = _channelSet;
        _echoHelloRemoteObject.source  = _echoHelloData.source;
       }
     
       private function initOperation():void
       {  
        _getHelloOperation = new Operation();
        _getHelloOperation.name = _getHelloData.name;
      
        _echoHelloOperation = new Operation();
        _echoHelloOperation.name = _echoHelloData.name; 
       }
       private function afterInitOPeration():void
       {
        _getHelloRemoteObject.operations  = {getHello:_getHelloOperation};
        _echoHelloRemoteObject.operations = {echoHello:_echoHelloOperation};
      
        _getHelloRemoteObject.addEventListener(ResultEvent.RESULT , getHelloResult);
        _getHelloRemoteObject.addEventListener(FaultEvent.FAULT , getHelloFault);
      
        _echoHelloRemoteObject.addEventListener(ResultEvent.RESULT , echoHelloResult);
        _echoHelloRemoteObject.addEventListener(FaultEvent.FAULT , echotHelloFault);  
       }

       private function getHelloResult(e:ResultEvent):void
       {  
        getHelloOutput.text = e.result.toString();
       }
       private function getHelloFault(e:FaultEvent):void
       { 
        getHelloOutput.text = "Remote失敗";
       } 
     
       protected function echoHelloResult(e:ResultEvent):void
       {
        output.text = e.result.toString();
       }
     
       protected function echotHelloFault(e:FaultEvent):void
       {
        output.text = "Remote失敗";
       }
     
     
       private function initBtnListener():void
       {
        getHelloBtn.addEventListener(MouseEvent.MOUSE_DOWN , callGetHello);
        echoHelloBtn.addEventListener(MouseEvent.MOUSE_DOWN , callEchoHello);
       }
     
       protected function callGetHello(event:MouseEvent):void
       {
        _getHelloRemoteObject.getHello();  
       }
     
       protected function callEchoHello(event:MouseEvent):void
       {
        _echoHelloRemoteObject.echoHello(input.text);
       } 
      ]]>
     </fx:Script>
     <fx:Declarations>
      <!-- 将非可视元素(例如服务、值对象)放在此处 -->
     </fx:Declarations>
     <s:Panel width="300" height="200" title="echoHello">
      <s:layout>
       <s:VerticalLayout gap="2" paddingTop="5"/>
      </s:layout>
     
       <s:HGroup width="100%" >
        <s:Label text="回傳結果"/>
        <s:TextInput id="output"/>
       </s:HGroup> 
       <s:HGroup width="100%">
        <s:Label text="輸入數值"/>
        <s:TextInput id="input"/>
       </s:HGroup>  
       <s:Button id="echoHelloBtn" label="call echoHello"/>  
     </s:Panel>

     <s:Panel width="300" height="200" title="getHello">
      <s:layout>
       <s:VerticalLayout gap="2" paddingTop="5"/>
      </s:layout>
      <s:HGroup width="100%" >
       <s:Label text="回傳結果"/>
       <s:TextInput id="getHelloOutput"/>
      </s:HGroup>  
       <s:Button id="getHelloBtn"  label="call getHello" />
     </s:Panel>
    </s:Application>

    輸出畫面:


    下次將來測試一下Servlet與Mapping Value Object

    Linux上安裝tomcat6.039 (圖文版)

    連結資料:
    Apache Tomcat官網
    Tomcat6下載頁

    Step1.下載tomcat
    • 如果你的linux有圖形介面只要使用firefox到tomcat官網直接下載,下載完後檔案會再home/Downloads/底下。
    • 若沒有:
      • cd ~
      • cd Downloads
      • sudo wget http://apache.cdpa.nsysu.edu.tw/tomcat/tomcat-6/v6.0.32/bin/apache-tomcat-6.0.32.tar.gz
      • 輸入你的操作權限密碼
    Step2.修改檔案群組與讀取權限(若你是使用wget下載,需執行此步驟)
    • ~/Downloads$ sudo chgrp -R jeffery apache-tomcat-6.0.32.tar.gz
    • ~/Downloads$ sudo chmod -R 771 apache-tomcat-6.0.32.tar.gz
    Step3.解壓縮
    • 有圖形介面的linux直接點擊解壓縮即可。
    • 若沒有圖形介面:
      • ~/Downloads$ tar xvzf apache-tomcat-6.0.32.tar.gz
    Step4.更改資料夾名稱並將其移到/opt底下
    • ~/Downloads$ mv apache-tomcat-6.0.32 /opt/tomcat6
    Step5.啟動tomcat
    • /opt$ tomcat6/bin/./startup.sh


    執行後出現:


    Step5.使用瀏覽器測試Tomcat6有無運作
    • 瀏覽器URL輸入:http://127.0.0.1:8080/
    Tomcat預設使用Port Number為8080
    出現以下畫面即Tomcat運作成功


    Step6.修改Http使用的PortNumber與使用編碼
    • sudo gedit /opt/tomcat6/conf/server.xml
    找到:
    <Connector port= "8080" protocol="HTTP/1.1"
                   connectionTimeout="20000"
                   redirectPort="8443" />

    修改port為8400:
    <Connector port= "8400" protocol="HTTP/1.1"
                   connectionTimeout="20000"
                   redirectPort="8443" URIEncoding="UTF-8"/>

    儲存變更

    server.xml是tomcat的組態設定檔

    Step7.重新啟動tomcat
    • /opt/tomcat6/bin$ ./startup.sh

    開打瀏覽器,輸入http://127.0.0.1:8400/,出現tomcat畫面即修改成功。


    Step8.替tomcat設定ubuntu桌面上快速啟動圖示
    • 滑鼠右鍵 → 新增啟動圖示
    出現操作畫面如下輸入:
    • 類型:應用程式
    • 名稱:tomcat6_startup
    • 指令:/opt/tomcat6/bin/startup.sh


    如此,方便操作tomcat的啟動,當然你可以在建立一個shutDown的操作圖示。


    Step9.新增tomcat的環境變數 (要新增此環境變數才可開發與使用servlet)

    #tomcat environment
    export CATALINA_HOME=/opt/tomcat6
    export CLASSPATH=$CLASSPATH:$CATALINA_HOME/lib:$CATALINA_HOME/lib/servlet-api.jar


    Step10.載入新設定

    • source /etc/profile


    補充說明:
    <Host name="localhost"  appBase="webapps"
                unpackWARs="true" autoDeploy="true"
                xmlValidation="false" xmlNamespaceAware="false">

    在Server.xml設定檔中,Host name內有一屬性unpackWARs="true",這代表會自動將war解壓縮。

    2011年5月11日 星期三

    FlashBuilder Performance Profile view (性能概要文件與方法統計使用)

    FlashBuilder效能分析工具中,有一項Performance Profile view可以查詢應用程式中每個method被執行的次數,執行的時間花費,以便讓你追查效能狀況得知哪裡需要優化。

    使用範例:
    Step1.建立如下測試功能的程式碼
    //測試程式碼:
    <?xml version="1.0" encoding="utf-8"?>
    <s:Application xmlns:fx="http://ns.adobe.com/mxml/2009"
                   xmlns:s="library://ns.adobe.com/flex/spark"
                   xmlns:mx="library://ns.adobe.com/flex/mx"
                   minWidth="955" minHeight="600"
                  >
          <fx:Script>
                <![CDATA[
                      private var _ran:Boolean = true;
                      protected function button1_mouseDownHandler(event:MouseEvent):void
                      {
                         if(_ran)
                         {
                            _ran = false;
                            for (var j:int = 0; j < 100000; j++)
                            {
                              trace(examA4());
                            }
                            _ran = true;
                         }
                      }
                      private var str:String = "http://www.test.yes/index.html";
                      private function examA4():String
                      {
                          var targetIndex:int;
                          targetIndex = str.lastIndexOf("/") + 1;
                          if(targetIndex >= 0 ) {
                              return(str.slice( targetIndex , str.length));
                          }else {
      return null;
                          }
                      }
                  ]]>
           </fx:Script>
       <s:Button mouseDown="button1_mouseDownHandler(event)"/>
    </s:Application>
    Step2.點擊圖示,進入效能分析模式
    Step3.點擊正在運行的程式,並點擊捕獲性能概要的圖示


    Step4.捕獲文件後,雙擊文件,打開性能概要文件窗口


    可以看到窗口內有所有method被執行的訊息,目前Button的mouseDown還未觸發,所以還沒見到examA4()的執行狀況。

    Step5.點擊瀏覽器上的Button來觸發執行examA4()
    • examA4()還在跑的時候,可以看見瀏覽器上Button還在被MouseDown的狀態,執行完畢的話Button會回復原狀。
    Step6.examA4()執行完成後,再次點擊捕獲性能概要文件
    Step7.再次點擊被捕獲的文件,可以看到examA4()被執行狀況的資訊了


    如此可以觀察到,examA4()被調用了幾次,占了應用程式中總調用的百分比,發費了多少時間等等。

    在這裡只是一個操作範例,一般使用上是拿來追蹤程式中method被調用以及執行效能狀況,以便判斷哪裡需要優化。